Saturday, September 7, 2019

How to Bead Letters Tips and Tricks

September 8, 2019 Sunday 
Tips and Tricks on working on Beaded Letters 

1. Use beads that have wider or bigger holes in them to pass through the string easily. We are gonna pass through certain beads several times so it will be much more convenient for us to choose such beads. 

2. Watch out for my suggested string lengths and use them so as not to waste the string. 

3. Cut the string slanted if ever it gets crooked and try again passing it through the holes. 

4. The left and right string should somehow be of equal length but as we work our project one might be longer than the other one and it's ok. 

5. Pick holes with a pin just to unclog it if ever it gets difficult to insert them and then try again. 

6. Work on first columns for certain letters before working on the other parts of the letter. 

7. Take note that a regular cube requires putting 2 clusters of 4 first while a slanted cute required putting 3 clusters of 4 first. 

8. Tighten as you go 

9. Pass through left string through a series of beads for about 2-3 inches before cutting them so that it will not be taken off easily and to make the item sturdy. 

10. Avoid inserting left string through consecutive beads so it won't be visible. 

11. Use a jump ring to connect the keyring to the beaded letter. 

12. Have patience in untangling beads once they get jumbled. If ever you can just take them out and start again. 

Happy Beading Everyone!

Sunday, August 18, 2019

The Beaded Letters Tutorial Update

Here are the Beaded Letters Tutorial so far... I have managed to put up 7 letters of the alphabet and they are the "A", "B", "C", "D", "E", "F", "G", "H". You can see them on my Youtube Channel called "Gantsilyera", or just search for cedie aqui. I have put them on a playlist if you want to make them one by one. The rest of the alphabets I will put up soon as I filmed them. I'm just juggling between taking care of my nieces and nephews and working on crochet projects and making them so please bear with me. We are having internet problems lately so they are getting a bit delayed. I hope you guys enjoy making them and Happy Beading everyone!

Opening a Shop on Shopee

I've been educating myself with stuff about shopee and I'm happy to share with you guys that I was able to put items there. It is an online shopping app I had downloaded for a while now because I was browsing back then for some unique yarns and found some of them. I have put up orders before and has successfully bought them througout the last couple months. I'm so happy with my purchases and didn't realize I can also sell my stuff there. A suggestion from my cousin pushed me to go with it. I was also inspired by one of the local seller of yarn here in the Philippines and it is from JC Crochet. The person who assisted me on putting up the shop told me to put up 10 items already so that the COD option wouldn't expire. So now I'm really thrilled to work on more crochet items and put up the accumulated ones I have on hand. So please check out my shop if you are able to and it is shopee.ph/rositafuentesaquino The name of the shop is also Gantsilyera from my name on Youtube. I will be very happy if you can support me there as you have supported me with my Podcasting Journey. Great day to everyone!

Wednesday, July 24, 2019

How to Bead Letters Tutorial Series

July 25, 2019 Thurs How to Bead Letters Tutorial Series This is the Intro that I used on the Youtube Tutorial that I have been putting up lately. I hope that it will help you guys in making the letters. 
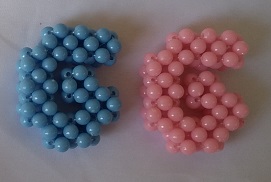
So today I'm gonna show you guys how to work on the beaded letter that I'm turning into a series. A tutorial from A - Z. It is basically a sequence/side by side cubed clusters of 4 as I call it forming the shape of a certain letter. There are going to be 26 tutorials as there are 26 letters in our alphabet. I would recommend to use or pick up beads that have big holes in them to make the process easier because we're going to pass through the beads several times in order to place the string on the right position acquiring the shape of the letter. It's gonna be tricky and a challenge to do it so please bear with me. I will try my best to show it to you guys so it will be simpler. The letter I have made as samples are all in capital letters although I'm thinking of making smaller letters after. The bead I'm using for this project is called "chalk beads", a cheaper of bead that is available her in the Philippines but you have the option of using the acrylic ones. The ones that we used in making our other projects. Terms we're using is all in English except for the word "salikop" w/c is a tagalog term. It can be translated to "interweave" but saying salikop would be much more convenient for me and I always use it to all my bead tutorials. I may turn this tutorial series into a tagalog version but it might be after working on all the letters in the alphabet so please do check that out. The pattern is not my own. I just have a picture to refer to and learned how to make them myself so I'm hoping not to violate any copyright law. The details about this project will be on the description box below and for more info I'm planning to write them on my blog (which I am doing now). So specific info about the project will be there (here). Sometimes when it is hard to insert the string because it gets crooked I cut it slanted so it will be easier to pass through. At times the hole gets clogged so you can poke it using a pin and try again inserting the string. Whenever you make the cubes just tighten as you go to make the item sturdy. The Materials used will be shown in the beginning of each tutorial and they are the following: Nylon Monoline String 050mm Chalk beads or Acrylic Rough Beads 6mm Pair of Scissors Keyring (if you're making a keychain) Dimension: (5x4 cluster of 4, for other letters) (5x5 cluster of 4 for bigger letters) Approximately 2 inches high, 1 3/4 inches across Suggested String Length: (This is important so please take note of this in order not to waste your string) For small letters like A, I, C and other use (1 meter + 1 palm length of string) For bigger letters like M, H, W and the like use (1 meter + half arm length of string) Uses: So this project can be made into keychains or zipper pull for bags. It can be turned into a name or word as some type of decor or accent to your house. You can also put a magnet at the back to turn it into a refrigerator magnet. In my own experience I use this letters as some type of learning material to teach my nephew the alphabet or to form words with it. So I hope you learned something new today. Please do try out my tutorials on Youtube and I hope you enjoy making them as much as I enjoy teaching them to you. Happy Beading everyone!

Tuesday, July 23, 2019

Beaded Hello Kitty Wallet Tutorial in Tagalog

Beaded Hello Kitty purse Tutorial in Tagalog Nagkaroon ako ng pagkakataon na gumawa ng tutorial sa tagalog ng paggawa ng beaded na hello kitty wallet. Matagal na itong iminungkahi sa akin ng isa sa mga subscribers ko kaya natutuwa akong maipaalam sa inyo na meron na ako nito sa Youtube. Sana ay maraming matuto sa tutorial na ito at masiyahan ang lahat sa paggawa nito. Narito ang ilang larawan na aking nakuha ukol dito. Ito ay 3 inches pataas at 4 inches pahalang. Ang mga ginamit na materyales sa paggawa nito ay Acrylic Rough Beads na 6mm at Nylon monoline string na 050mm. Ikalawang disenyo ang wallet na ito at mas malaki siya kumpara sa ginamit ko sa aking unang tutorial. Nakuha ko ang ideya sa paggawa nito mula sa pinsan ko na nagpagawa nito sa akin sa tulong ng isang larawan. Kadalasan pinag-aaralan ko munang mabuti ang paggawa nito bago ko ito gawan ng tutorial gaya ng ibang mga nagawa ko na. Sana ay maudyok kayo na gumawa rin nito dahil isang uri ito ng pangkabuhayan na maaari ninyong gawin habang kayo at gumagawa sa loob ng bahay. Karagdagang kita rin ito para sa mga tao na gustong magkaroon ng maliit na negosyo.

Thursday, June 6, 2019

The Last Bits of the Character Purse Series

June 7, 2019 Friday Last month and these past few days has been a productive one for me as I'm on the verge of ending the character purse series I've been pushing to do this past month. I'm now on the process of uploading the 2nd part of the Doraemon-inspired purse. The next thing for me is to make a separate video on how to sew the lining and zipper. A subscriber suggested a smiley and hello kitty character purse so I'm still gonna learn that and maybe put that up next time. For now I wanted to put up first the simple bear beaded project and once I get that down I will be planning other ones. I'm quite apprehensive about the beaded bear as it looks very tricky and complicated to work and show. There might also be some problems on how to work the parts like the arms and legs. But despite of that I'm gonna take it step by step and maybe get there. So that's my update for now. Happy crafting everyone. Oh! and here are the accumulated pictures of the tutorials thumbnails:

Thursday, May 16, 2019

Character Purse Tutorial Series on Youtube

May 17, 2019 Friday Very happy to announce that so far I have put up four tutorials for the crochet character purse series that I'm pushing to make. I've been in the mood to make them one by one and follow through all of them. There are 10 specific characters on my list and I'm hoping that I can make all of them. I just have this thought of inserting the beaded tutorial for the bear in between them but that is still a thought. I'm happy to share this news to you guys and I also hope you can check and try them out. Happy crafting to all!

Thursday, May 9, 2019

Online Yarn Hauls 2019

May 10, 2019 Friday So eversince I discovered that I can shop online using an online shopping app I've been addicted to it eversince. Below are the yarn that I have recently acquired using the said app. The first one came from China and took 12 days to be delivered and are cotton yarns that are varigated. They are all 50 gram balls and very soft. I started working on a cellphone pouch using one of them and I really liked how it turned out. The second yarn order I placed is from a local seller from Tarlac. Her yarns are just fabulous and awesome. They are gradient yarns with subtle color changes. The yarn is in cotton and are stranded and not plied. I am working on a shawl using one of them and I'm really enjoying it so far. So since I really want to try out the other colorways from the yarn from China I placed a third order picking some of the dyelot that I missed the last time. It came within 9 days and I'm shocked at how fast it is just because the first one came after 12 days. So now I'm gonna figure out a project for the yarns and it's just nice having them on the side as some type of inspiration and something to look forward to.

Wednesday, April 24, 2019

Another Crochet Tutorial (Character Purses)

I'm whipping up another crochet tutorials that I've been daring to do. I started with the base part of the tutorial for Crochet Character Purses. Do hope that it will be well made. I recently got my first paycheck from Youtube and it got me inspired to continue on making videos like my usual podcasts and more tutorials. It makes me quite happy and proud in a way. So I'm also have been posting some small essays here to continue on with the journey. I will try my best to post here more often. So here I will post the first part of the tutorial.

Thursday, April 18, 2019

Trips During Vacation

It's Summer Vacation and it is really hot here in the Philippines. Last week we were able to go to Bataan coming along my siblings family and sister in laws family. We went there during the night and stayed for two more days. The first morning we went to a resort near their house called Jairus resort where there are plenty of pools to choose from. The kids really enjoyed swimming in them transferring from one pool to another. We constantly put sunscreen on them as it is really hot and they may have sunburn. At the back of the resort we discovered a stream and some rocky steps that leads to water and other pools with little water in them. All in all the trip had been refreshing. So I'm gonna put here some pictures that I've taken from there.

Monday, February 18, 2019

First Post 2019

February 18, 2019 Monday It's been a while since I posted a blog. I was busy. Well, sort of. I've been taking care of my niece and nephews because of ate's new work. Last December I was also working through several orders for beaded and crochet items. Some for my Tito which are keychains and wallets. One of my customers also ordered booties and sandals from me. So I keep filling it up. Just now that I can say I'm through all of those. There is still one order coming up but I'm thinking, hopefully there wouldn't be any for a while. That's why I'm focusing on this one task, which is to do a tutorial for crochet baby booties/sandals. I've been studying it and learning it. Researching as I go of terms I need to be familiar with. I'm on that process where I needed to take notes and make samples. I'm quite apprehensive on this one. Not that confident in working crochet tutorials compared to beaded ones.But I'm still hell bent on pushing it through. Gonna take it one step at a time and hopefully I can go pass it. I just hope there wouldn't be a problem and even if there's going to be one I got to be prepared for it. This year I have this two tutorials so far: